Implementation team
| Site: | Moodle ZČU |
| Course: | How to prepare a project for an internal grant programme IDEG |
| Book: | Implementation team |
| Printed by: | Nepřihlášený host |
| Date: | Monday, 9 November 2026, 10:09 PM |
1. Main/Individual implementor
In this tab, you need to add all members of your team (including a mentor) as well as all financial roles for your project.
You will notice that you will be already prefilled in the “Main implementor/Individual implementor” role and your “Consent to participate” will display as “Granted”. You also have assigned the working capacity of normal working hours of a full-time position 0.5.
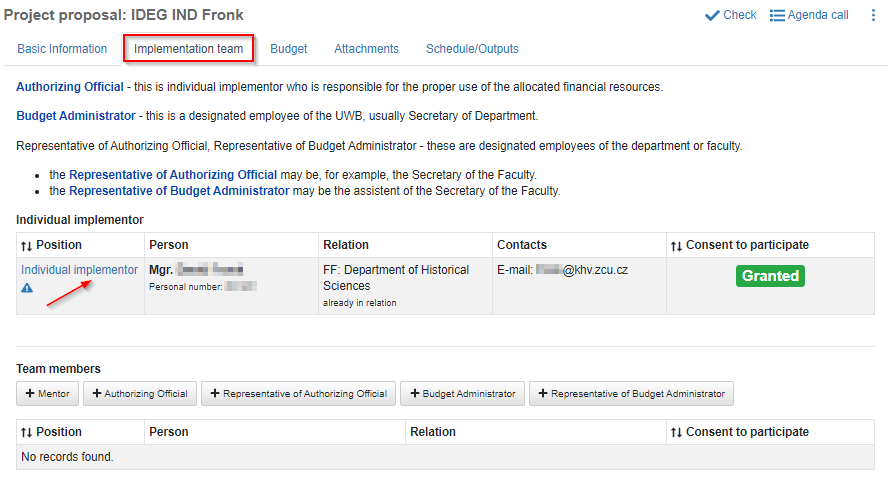
This is how this tab looks in an individual project:
Figure 18: Creating a new project – Implementation team tab – Individual project
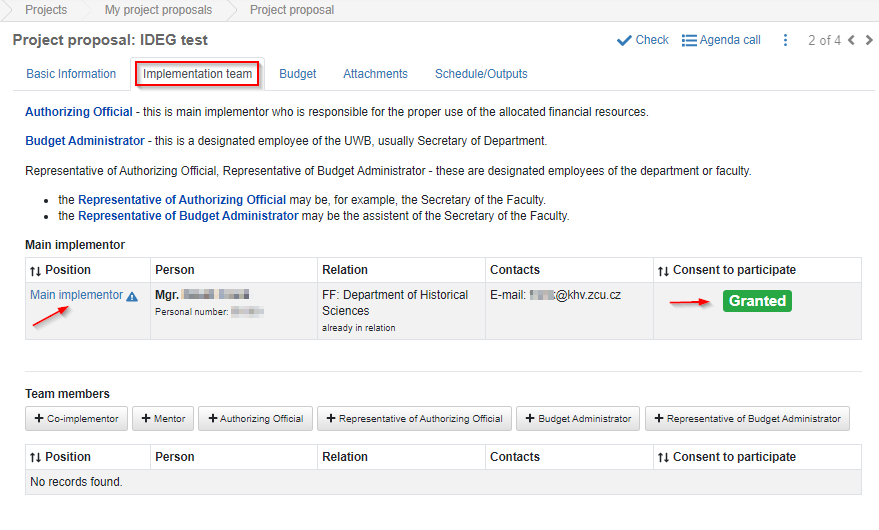
This is how this tab looks in a team project (the remainder of this section will be illustrated using a team setting as the process is same for both options):
Figure 19: Creating a new project – Implementation team tab – Team project
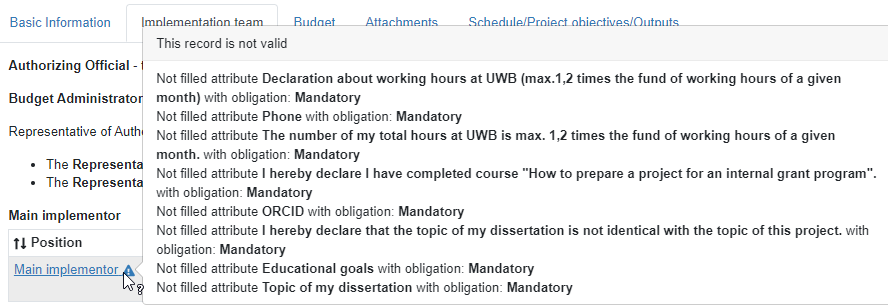
However, there is  icon next to your position indicating that there are some mandatory fields that yet need to be filled in. You will see those when you hover over the icon with your mouse.
Figure 20: Creating a new project – Implementation team – Main implementor
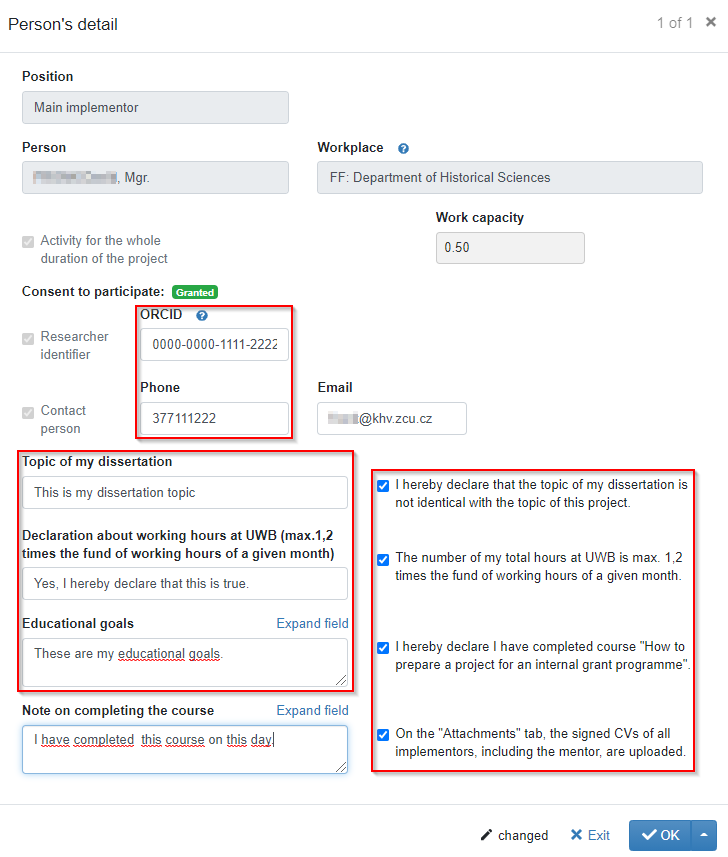
Click “Main implementor” link to open the form. Here is a list of all mandatory fields that must be completed for this position:
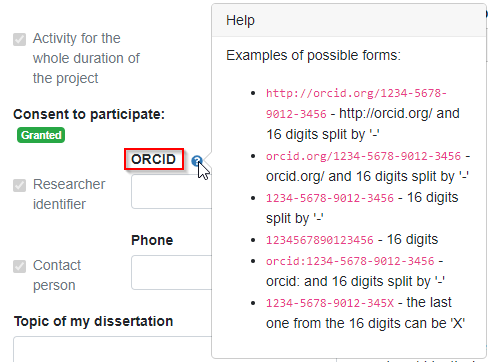
· ORCID: type in your ORCID ID (Open Researcher and Contributor Identifier). You can click help  icon to view acceptable format that you can put in.
Figure 21: Main implementor form - ORCID help text
· Phone
· Topic of my dissertation – type in the topic of your dissertation and check the box where you are declaring that this topic is not identical with the topic of your project.
· Declaration about total working hours at UWB – type in the declaration that your total working hours at UWB is max. 1,2 times the fund of working hours of a given month. Also make sure to check an appropriate check box as a confirmation.
· Educational goal – describe your educational goals, e.g. that you would like to improve your language skills.
· Declaration about course completion – it is mandatory that all members of your team (including yourself) complete the course “How to prepare a project for an internal grant programme IDEG” before the project proposal is submitted. Put a check mark in the appropriate check box if this is true. You can also add a note in the “Note on completing the course” text box (this is not mandatory).
· Confirmation about attached CVs – it is necessary to upload signed Curricula vitae for all team members (including the mentor) before the proposal is submitted. This can be done via ATTACHMENTS tab.
Figure 22: Completed „Main implementor form“
Once the form is completed, click  and hit
 save icon in the bottom right corner of the page. You can see that there is no exclamation next to your position now.
Figure 23: Implementation team – completed „Main implementor“ record

2. Co-implementor
When creating a team project, you need to add at least 1 team member as a co-implementor and a maximum of 2 co-implementors. The co-implementor can have working capacity 0.1 or 0.2 of normal working hours of a full-time position.
To add a co-implementor, click the  tab.
Figure 24: Implementation team – Co-implementor

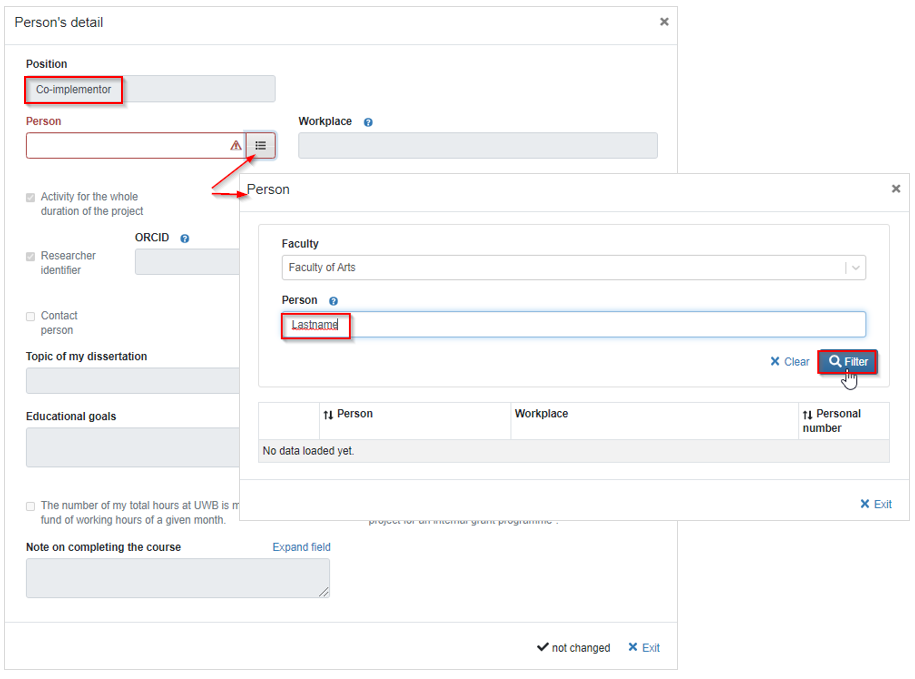
The form will be displayed. First you need to pick a person. Open the code list by hitting  on the right side of a “Person” dropdown. Next you can either type in last name (it needs to include diacritics) and hit “Filter” or click “Filter” right away. If you need to find a person from a different faculty, you need to select it from the “Faculty” drop-down and then do your search.
Figure 25: Implementation team – Co-implementor form
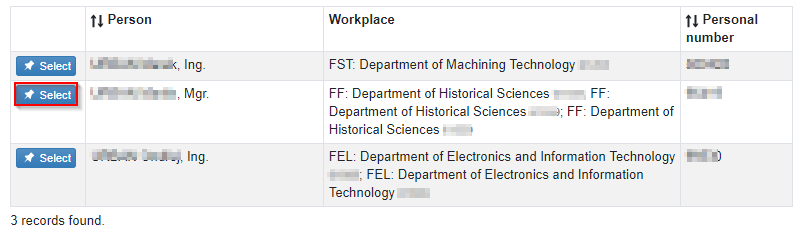
Pick your person from returned list by clicking  icon.
Figure 26: Implementation team – Co-implementor- person code list
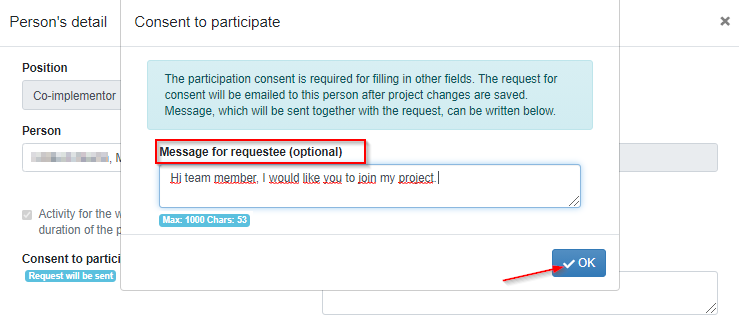
As each member of your team needs to agree with the participation, an email request will be sent to him/her once you save the person record. You can also include a personal note if you wish.
Figure 27: Implementation team – Co-implementor form – Consent for participation
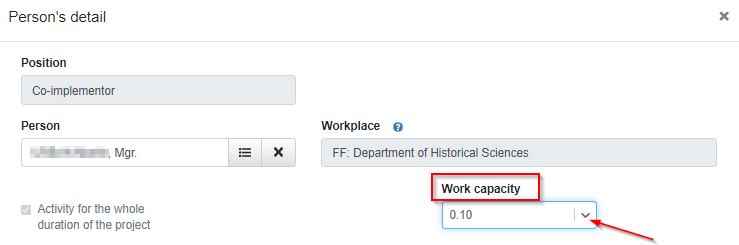
Next you must assign 0,1 or 0,2 work capacity from the drop-down. The work capacity you select is then tied to a calculation of your overall BUDGET.
Figure 28: Implementation team - Co-implementor form – assigning work capacity
Once you hit OK, you will see an indication that the request for participation approval will be sent.
Figure 29: Implementation team – Co-implementor record

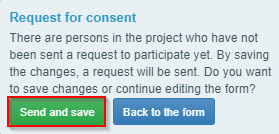
When you go ahead to  save the added record, you´ll need to approve the sending of the request by clicking
 .
Figure 30: Confirmation for sending of the participation consent
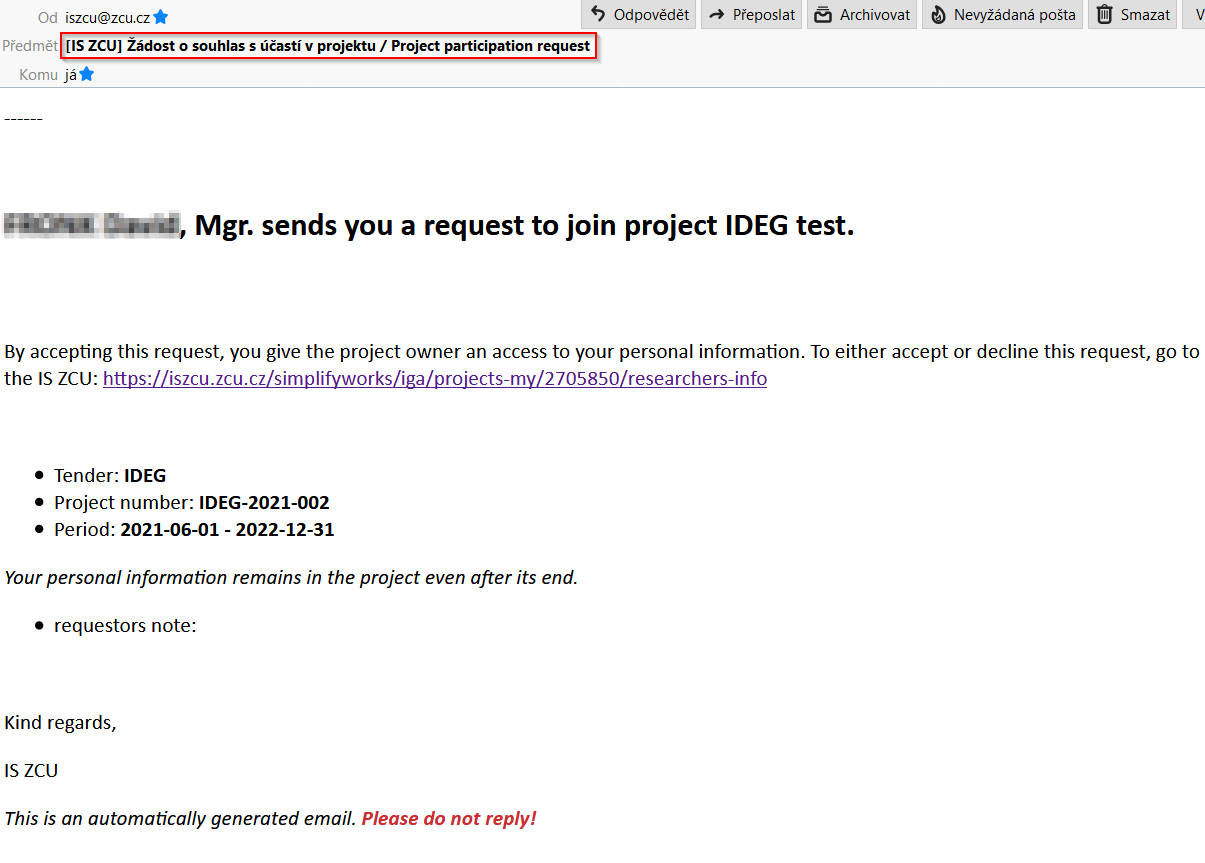
Team members that you nominated (including mentor and financial roles) will receive the following email.
Figure 31: Participation consent request – sample email
After clicking custom iszcu.zcu.cz link from the email, the co-implementor will be logged into the “Implementation team” tab of your proposal where he/she needs to click  button.
Figure 32: Implementation team – Co-implementor approving the participation

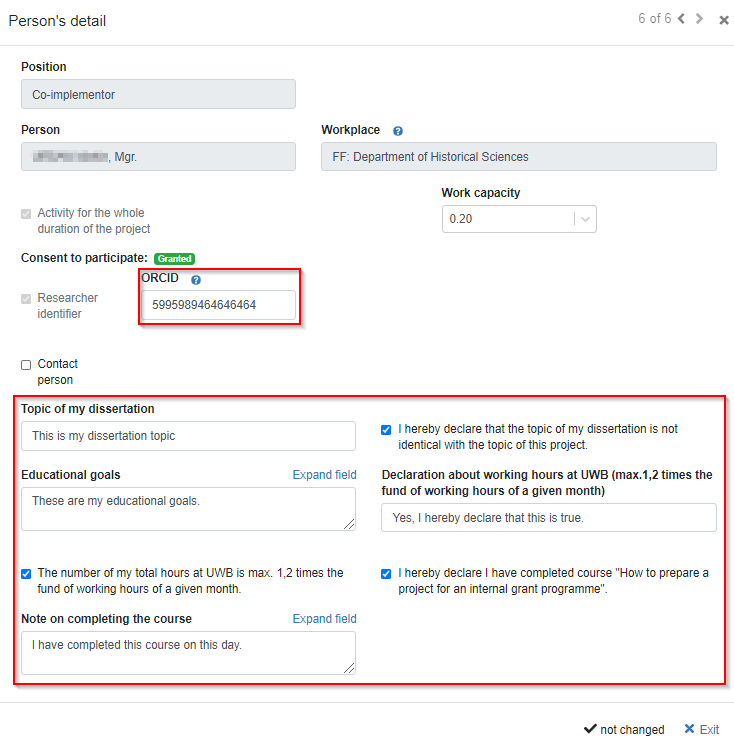
Next, the co-implementor needs to click blue “Co-implementor” link and fill out the following fields:
· ORCID
· Topic of my dissertation – type in the topic of your dissertation and check the box where you are declaring that this topic is not identical with the topic of your project.
· Declaration about total working hours at UWB – type in your declaration that your total working hours at UWB is max. 1,2 times the fund of working hours of a given month. Also make sure to check appropriate check box as a confirmation.
· Educational goal – describe your educational goals, e.g. that you would like improve your language skills.
· Declaration about course completion – it is mandatory that all members of the implementation team complete the course “How to prepare a project for an internal grant programme IDEG” before the project proposal is submitted. Put a check mark in the appropriate check box if this is true. You can also add a note in the “Note on completing the course” text box (this is not mandatory).
Figure 33: Completed „Co-implementor form“
Then the information that was put in must be confirmed by clicking  and saved by hitting
 icon in the bottom right corner of the page.
This is how it looks once the team member approves his/her participation and completes all necessary information:
Figure 34: Implementation team – Co-implementor – approved and completed record

3. Mentor
Each implementation team has its mentor, who provides them with methodological and professional support, and helps with planning the individual steps in the implementation of the project. A mentor is an expert in a given field in the Czech Republic or abroad, with a minimum academic qualification of Ph.D. The mentor is not an implementor, nor a project manager, nor does he/she evaluate the project.
4. Internal mentor
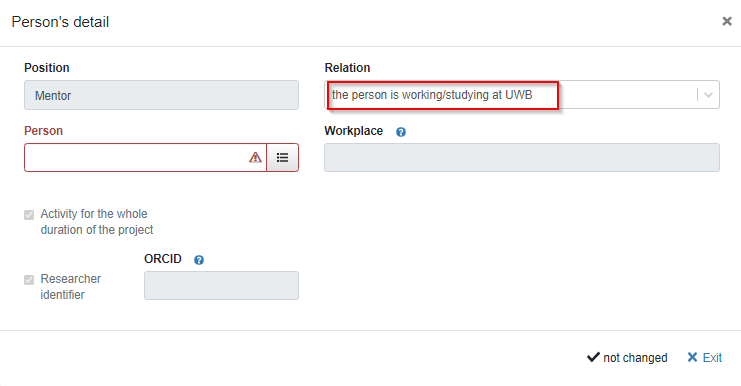
To add an internal mentor, hit  tab and once the form opens up, pick “the person is working/studying at UWB” from the “Relation” dropdown.
Figure 35: Implementation team – Internal mentor – picking „Relation“
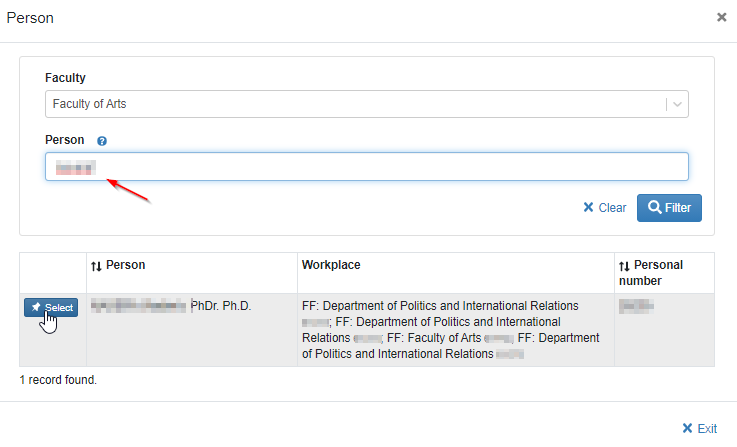
Next, select the person from the code list (the workplace will be automatically populated) – as described previously for co-implementors.
Figure 36: Implementation team – Internal mentor – person code list drop-down
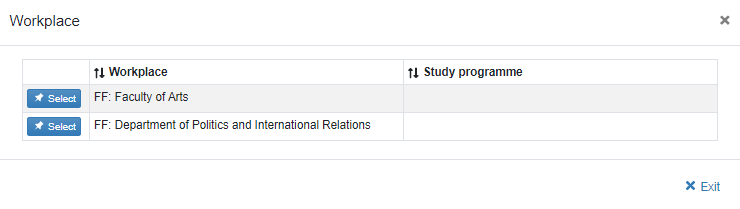
If there is more than one workplace listed, you need to pick one by clicking  .
Figure 37: Picking a workplace
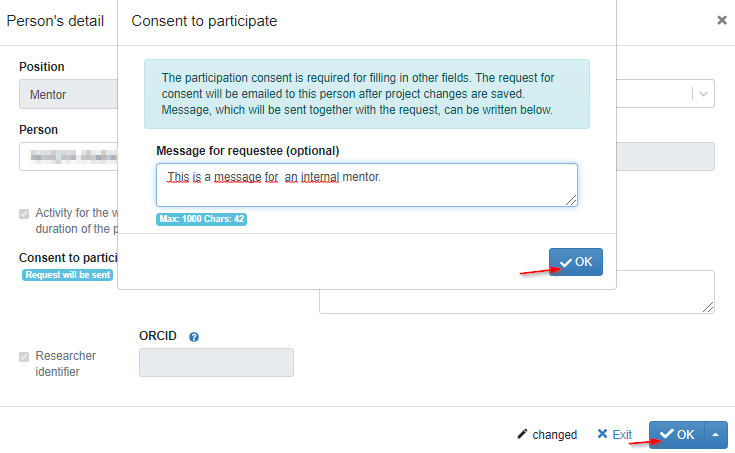
Again, confirm the sending of the approval request and hit  .
Figure 38: Implementation team – Internal mentor - confirming the participation consent to be sent
This is how the form for the internal mentor looks like. Again, click  to get back to “Implementation team” page.
Figure 39: Implementation team – Internal Mentor
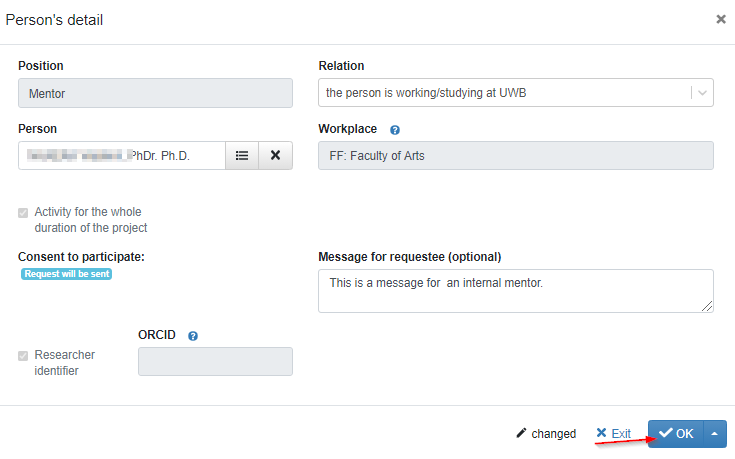
This is how it will look like once you add your internal mentor.
Figure 40: Implementation team – newly added internal „Mentor“ record

When you hit  save icon in the bottom right corner of the page, you´ll need to approve the sending of the request for participation by clicking
 .
Your mentor receives project participation request email where he/she needs to click custom iszcu.zcu.cz and once logged into the “Implementation team” tab of your proposal, he/she needs to agree with the participation by clicking  button.
Figure 41: Implementation team – Internal mentor – approving participation

Next the mentor needs to click blue “Mentor” link and provide ORCID. Then the provided information must be confirmed by clicking  and saved by hitting
 icon in the bottom right corner of the page.
Figure 42: Completed internal „Mentor form“
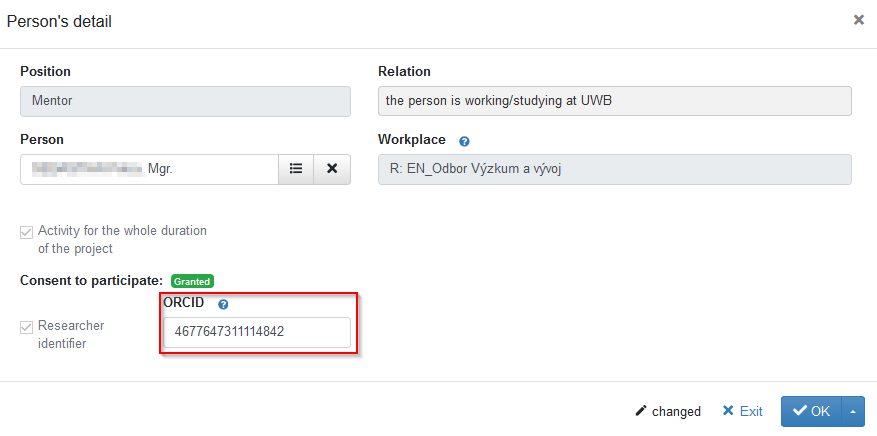
This is how it looks once a mentor approves his/her participation and completes all necessary information:
Figure 43: Implementation team – Internal mentor – approved and completed record

5. External mentor
To add an external mentor, hit  tab and once the form opens up, pick “the person will enter into a relationship with UWB if the project receives funding” dropdown. Fill out the following fields:
- First name
- Surname
- Expected workplace: click workplace code list drop-down  on the right. To assign the workplace for the external mentor, type in “University of West Bohemia” in the “Organization name” search field and hit
 . Then click
 to pick this workplace.
- ORCID fields
Figure 44: Implementation team – External mentor – Expected workplace
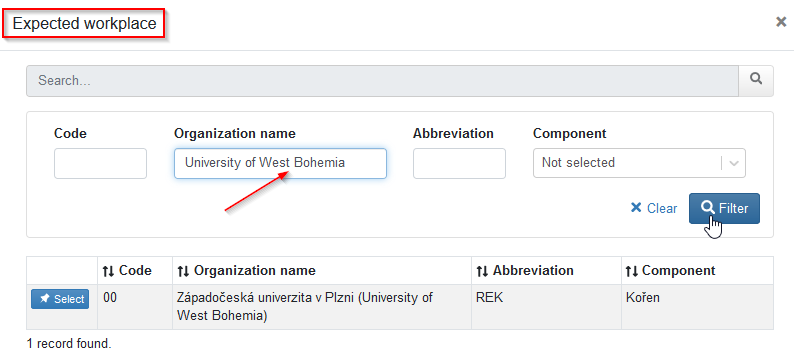
Figure 45: Implementation team – External mentor – picking „Relation“
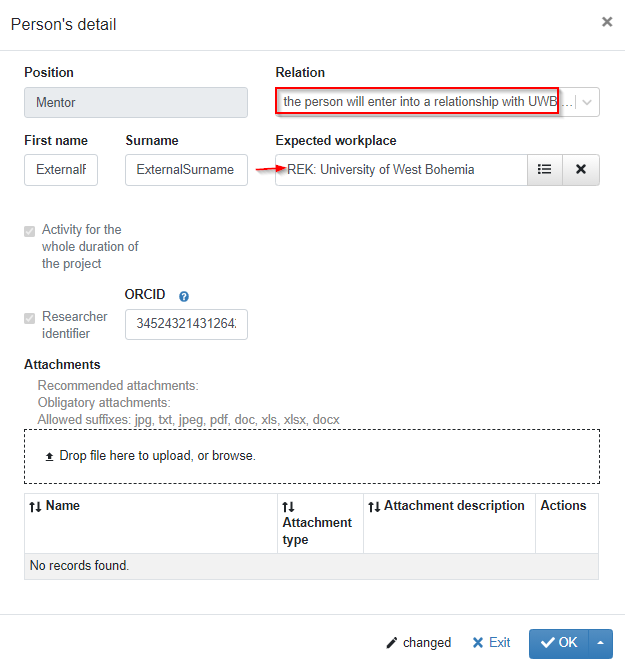
You also need to provide your external mentor´s approval for this role. As the external mentor is not being assigned from the code list at this point, you need to attach his/her signed approval with the role in the form of an attachment where he/she expresses this consent.
To do this, click “Drop file here to upload, or browse” link and locate the document on your computer. You can see that the attachment type assigned is “Consent to participate”. Click  and save everything by clicking
 icon in the bottom right corner of the page.
Figure 46: Implementation team – External mentor – attaching participation consent
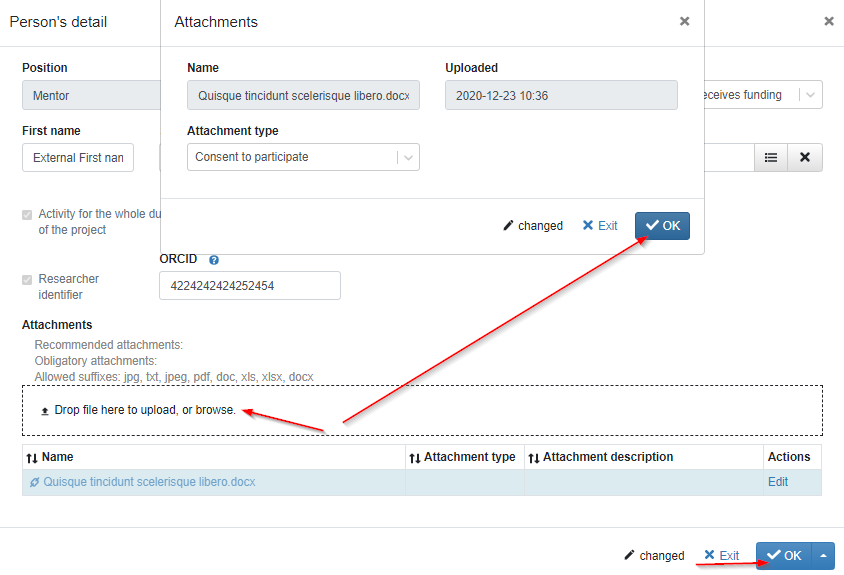
This is how it looks once a record for the external mentor is completed:
Figure 47: Implementation team – External mentor –completed record

6. Financial roles
Authorizing Official - submits the Financial Control Protocol and is responsible for the proper use of the allocated financial resources. This is – in fact – the main/individual implementor.
Budget Administrator - this is a designated employee of the UWB, usually Secretary of Department.
Representative of Authorizing Official, Representative of Budget Administrator - these are designated employees of the department or faculty.
- the Representative of Authorizing Official may be, for example, the Secretary of the Faculty.
- the Representative of Budget Administrator may be the assistant of the Secretary of the Faculty.
Figure 48: Implementation team – Financial roles

6.1. Authorizing Official
To add yourself as an Authorizing Official, click  button. As this role will enter into force once your project is approved for support and after you sign an employment agreement with UWB, you need to pick “the person will enter into a relationship with UWB if the project receives funding” option from “Relation” dropdown. Next type in your First name, Surname and pick Expected workplace from the code list drop-down.
Figure 49: Implementation team – Authorizing Official form
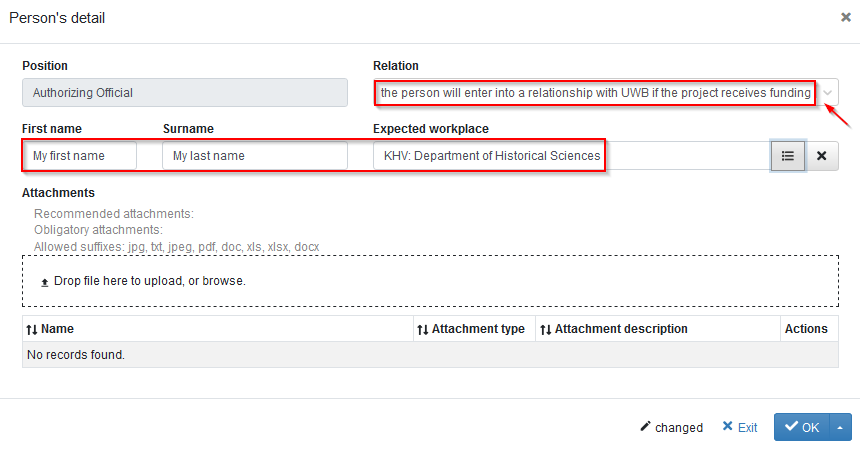
You also need to provide your approval for this role. As you are not being assigned from the code list at this point (since your project has not received funding yet and you have not signed the contract and therefore you are not in the system for these purposes), you will formally express your approval in the form of an attachment where you express this consent.
To do this, click “Drop file here to upload, or browse” link and locate your document on your computer. You can see that the attachment type assigned to your document is “Consent to participate”.
Figure 50: Providing consent for „Authorizing Official“ role
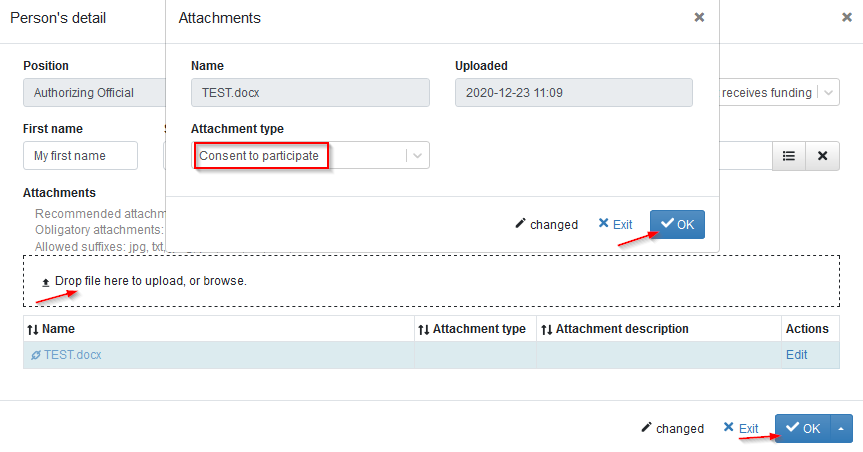
Then click twice  to confirm this action and make sure to click
 save icon in the bottom right corner to save everything.
This is how it looks once this role is approved and properly completed:
Figure 51: Implementation team – Authorizing Official –completed record

6.2. Budget Administrator
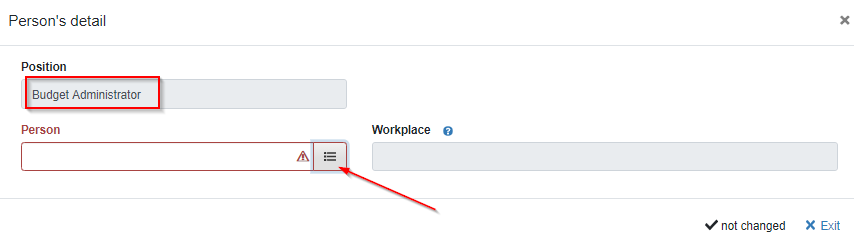
Budget Administrator, Representative of Authorizing Official, Representative of Budget Administrator: the process for addition of these roles is identical therefore it will be illustrated using Budget Administrator example only.
Click  icon in the “Team members” section and add a person from the person code list drop-down.
Figure 52: Implementation team – Budget Administrator form
Again, you will be asked for your confirmation to send the approval request.
Figure 53: Implementation team – confirming the participation consent to be sent
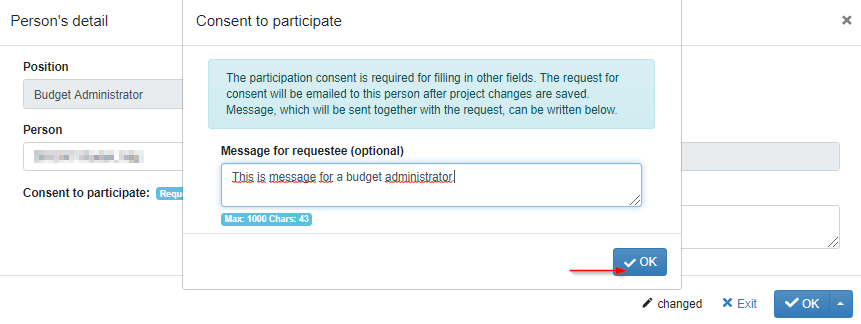
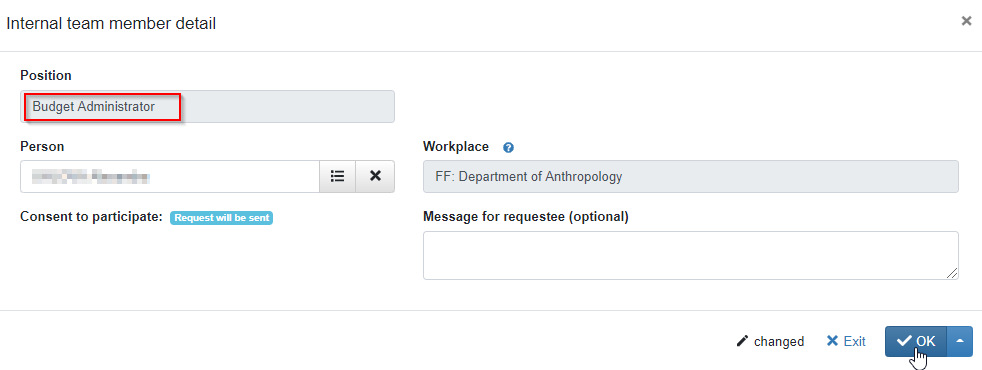
Once you confirm, person and workplace box will be populated. Next hit  to get back to “Implementation team” page and make sure to click
 save icon in the bottom right corner to save everything.
Figure 54: Implementation team – Budget Administrator form filled out
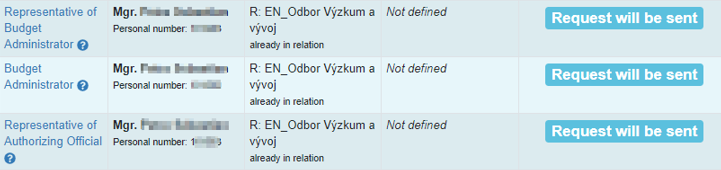
This is how it will look like once you add the financial roles:
Figure 55: Implementation team – Financial roles before sending of the participation consent
Again, once you hit  save icon in the bottom right corner, you´ll need to approve the sending of the participation request by clicking
 .
All team members in the financial roles will also need to log into your project proposal and agree with their participation as described above for the other team roles.